Showing posts with label DIY. Show all posts

Tuesday, August 14, 2012

To ant or not to ant

A few months ago I got hit with Summer Ants.  It's something that I've grown up with for years. It was so engrained in my life that I didn't believe it was possible to have summer with out the little buggers.  This year is the first time in my 3 years of being in my current place that I've run into this problem.  Sugar supplies must have been low because they found their way into every single sugar item I own.

It occurred to me that now was the perfect time to test out a organic remedy for ants that I'd seen on Pintrest at some point.  Corn Meal. What?  That's my first thought when I read the post.  These people must be wrong.

The idea is that you put down some corn meal, and the ants eat it or bring it back to the nest and apparently they can't digest the stuff, so they die.  The entire colony or a large portion of it, because I suppose they eat the stuff before anyone figures out what is going on.

So I pour a bowl of corn meal and place it to the spot where I traced the ants to, behind the biggest couch in my house.  And nothing.

As you can see, there are no ants crawling over the edges to get to the cornmeal feast I have laid out. They apparently care for the stuff so little, that even when bribed with a dead fly sprinkled with Corn meal they couldn't care less.

You can kind of seen the ants in that picture, and accept to pull the fly out, they never went into the corn meal.  Basically ignored it completely.


These ants also appeared to completely ignore the generic ant traps that I bought after the corn meal failed to rid my house of the darn things. So perhaps it's just a case of the super smart ant tribe?  Once I boxed up all the sugar items they could find and kept washing any sugary dishes I ate, they disappeared.  I may never know the real reason.

Sunday, June 24, 2012

Reupholstered Chair

This weekend, I found myself with a bit of extra time on my hands. Not alot but enough to fit in a project!  Weird, as finals are coming up and there's large papers and projects coming due.  But I didn't look to hard at it. You know, grabbed opportunity when it struck. I'm just going to thank myself for finishing some projects early and move on!!

I decided to reupholster my desk chair that was in serious need of a new seat cover. 

 It's a chair that was purchased to serve as my desk chair from an estate sale.  Some poor elderly widdow probably just lost his wife and I reeped the benifits.  No no, I kidd.  I've been to alot of estate sales, and while alot of them are due to a death in the family, it's really not the only reason that estate sales occur.  But I digress.

Step 1: involves removing the seat from the frame of the chair. A simple enough task with this chair as it has no screws holding the seat down. Below is the seat relieved of it's duty, lining out it's back. 


Step 2: Remove ALL the staples holding down the black backing.  There are alot of them, they are nearly side by side. 


Yatta!  
With the black back set to the side you've got the first vision of your new seat.  It's actually a relatively old  cushion pushing down into the center of a wooden frame.
 

 Actually looks like it was well made at the beginning of it's life, but what do I know? I'm just a busy DIYer so I'm not taking the time right now to research.  I'm going to forger ahead.


 Step 3: Now remove ALL the staples holding down the worn stripped seat fabric.  Attempt to avoid getting carpel tunnel syndrome due to repetitive movements required.  Remember proper body mechanics and keep your wrists safe from undue damage. 


Congratulations!  Removing that layer of striped fabric reveals a currently attached amount of funny batting and what looks like the original seat covering. If you look closely at said original seat cover and cushion (that ugly looking form on the L side of the picture below) you can actually see rough fibers sticking out through the thinning gray/blue fabric from the 40's and searching for a body part to scratch.


I truthfully have no idea what type of animal is in this seat, and I'm not sure I care to know at the moment. Safe to say, it would be uncomfortable to sit on.   It makes the extra batting make so much sense. While leads me to ...

Step 4: Adding foam support.  Using the seat itself as a tracing shape I marked to extra carpet foam, and cut out two chair shaped covers.


Step 5:  Reapply the batting from previous upholster job. True it probably would have been better to completely replace the batting, but I don't own any and didn't want to increase the amount of time spend on the project (as school would suffer) and continued in the Quick-n-Lazy vain. 

Below is a picture revealing the layers that are now in the seat. 


Step 6: Not pictured, cutting out of seat cover fabric.

Step 7: Flip seat & all layers over on to the fabric which was cut to size and being stapling like a mad person! This is where you can stick it to future generations of reupholsters and fill the base with the metal staples or not, it's up to you.  I went with a half & half option, using lots of staples to hold the seat cover fabric in place... but not so many when replacing the back blacking (as seen below).


Step 8: Replace the black backing and staple away.  Here is where I chose to be more frugal with my staples, it's just backing, and really is just adding extra support to the seat cover fabric. 


Staple Staple Staple


Step 9: Replace newly refreshed seat into the chair!


Step 10: Pat Back!

Saturday, March 3, 2012

Wall Art Finished!

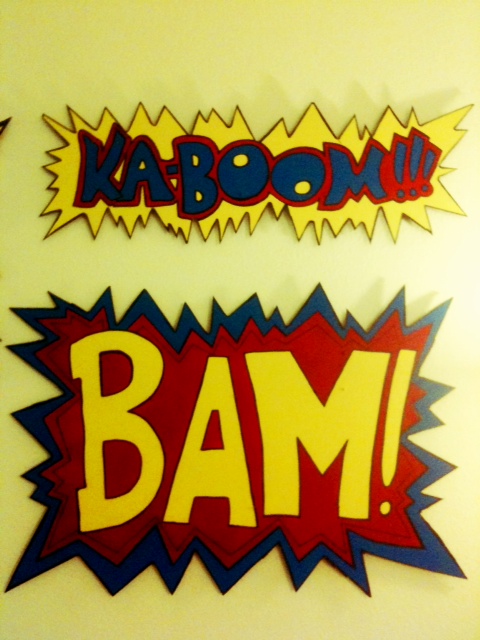
Finally, after a few months of the project just sitting on the floor my comic inspired wall art is finished and hanging.


 All the work up there took a while to get used to.  I first hug BAM and felt like it was way to much color. So it took a while to get the rest of them up there.


And I love the Kablam!!  It's a call back to my child hood.  the show Kablam was a great way to spend some time laughing.

Saturday, February 25, 2012

Knife Project

 The knife project is basically finished.  All my knives now have nice shiny handles.


 They've been restained and have a coat or two of polyurethane in these pictures.  


There are some very complicated seeming ways to go about refurbishing knife handles.  And I know that poly isn't the most food safe choice, but I personally feel that I don't use the knifes frequently enough, and the food doesn't normally rub on the handles, so i'm all right with it.  A deciding factor in my choice was that I have poly on hand and do not own any of the oils and things that the internet recommended for the job. 

It is safe to say that I am happy with the results.  

Now I just need to figure out what to do about the knife block.  It's looking extra drab itself now.  


It just can't compete with the stylish and shiny knives it houses!!!

Saturday, February 4, 2012

Knives

It's about time that my kinfe block got a new life.  The block is a large chunk of dark wood that eats up space.  But as I'm not yet a huge fan of the magnetic strips attached to the walls, I'm thinking that I've got to find a way to liven this baby up rather than replacing it with a modern storage form.


The knives themselves were hand me downs from my parents, and have been going strong since before I was born.  Now the wear and tear is getting pretty obvious.  The handles have lost their luster.  The protective poly coating is basically gone.  And on the knives that get really frequent use the stain is disappearing.


Below is the close up, they're lacking shimmer and shine.  These poor knives appear tired.  

So right now I'm in the process of sanding the handles down.   I'm going to have to look up what's the best way to re-liven them.  My instincts say re-stain and coat with polyurethane.  But I may just be treating them like cabinets, and am unsure of the food safety level of polyurethane. Whatever I use I want it to be food safe and water proof, as knives will find themselves in and around food and water. 

Tuesday, January 3, 2012

Wall Decor

The first project of the year has begun.  For quite sometime now I've been wanting to pay homage to my love for comics.  Something that I've always been in love with are the word bubbles that used to pop up during the Batman TV shows and were sprinkled in original comics. Naturally the internet was scoured to find reference images and I settled on these two,


And the next step was to purchase some wood, I went with tempered hardboard, and then start drawing and cutting.  Tomorrow begins the painting part of this adventure.  And that is the scariest part.  As a child I was always least happy with the coloring potion of the activity.   Could draw something to my satisfaction, but when I colored it there was always something off.